Sunday, August 22, 2010

Fun With Gadgets Windows 7 How To


A nice feature I like about Windows 7 are Desktop gadgets. Such as the ones shown in picture.


This tutorial will you show how to customize these gadgets. By removing and placing them on the desktop. I will also show you how to get more gadgets. 


Step 1) Right Click anywhere on the desktop as follows


Step 2) Now simply scroll through the lists of gadgets and drag and drop the gadgets you wish to place on the desktop. To get more gadgets simply press Get More Gadgets and follow the steps to download extra gadgets. 


4) To Remove a gadget simply right click a gadget and click close gadget as show. There you have it I hope this a tutorial was quick and easy.


Saturday, August 21, 2010

Fishing For bandwidth in the Reserved Pool?


Here is an nifty trick my friend Jarrod taught me a while back. Windows 7 has a feature called Remote Differential Compression. Basically, what the feature does is reserve 10-20% of your bandwidth for system processes. Now do I need windows to reserve this bandwidth. The question is yes or no. If your using windows 7 to host a server then yes it is recommended for windows to hold this bandwidth. But, if your a casual computer user the answer yes. What will happen if I disable this option?You will free up 10-20% of your bandwidth making your internet speed go a little faster. This tutorial will show you how to disable that feature. Shall we get started.

Step 1) Hit the windows logo and navigate your way to the Control Panel. Like follows.


Step 2) Now navigate to programs and click it as follows.


Step 3) Now Click Turn Windows features on and off as follows

 
Step 4) Finally, scroll down till you see Remote Differential Compression, uncheck the feature, and click OK.

There you have it guys and gals. You just freed up 10-20% of your bandwidth. This will really help those struggling with slow speed on wireless connections. Hope you enjoyed my tutorial. Next, I will show you how to remove and place gadgets on your Windows 7 desktop.

Did the RUN Run off in Windows 7?


A lot people ask me this question. Where in the world is the run bar in Windows 7. Did the run run off? The answer to question is yes. Windows 7 replaced the run bar with a brandnew search bar. This tutorial will show you how to use that new search bar.

Step 1: Hit the windows logo and locate the Search Bar.
    2) Now type what ever file you want to open. In this case we are opening the game Solitaire and click the file once it shown as follows.
4) There you go. You now know how to use the new and improved search bars of Windows 7

Friday, August 20, 2010

How To Add Non Steam Games to Steam

This is a very nifty trick that my gaming friend Travis Taught me a while back. Basically, this tutorial will show you how to add non steam games to your steam account. This is a very cool trick because it enables you to stay in contact with your steam friends and it also alerts them what game your playing. Shall we begin

Once your logged in to your steam account. Click add game. As Follows.

Now Click on Add Non Steam Game As follows.
Now scroll till you find the game you wish to add. I will be adding the non steam game halo to my account. Click the check box beside the halo icon then click Add Selected Programs.


Now navigate to your games library and you should now see Halo listed in your games library. I hope everyone enjoyed this nifty trick.
Happy Gaming :)

Connecting To Ventrilo A Server How To?

Today I will show how to connect Ventrilo Server. What is a Ventrilo server one may ask? A ventrilo server is an server outlet that allows you to chat via voice IP with your friends and family. This program is widely used in online competitive games such as Call of Duty Modern Warefare 2 and the popular MMORPG World Of AWarcraft. Lets get started shall we.

The first thing you need to do is hop over to the website which is www.ventrilo.com. Click on the download link on the left then choose the download as shown.


The download will only take a few seconds to download and Install depending on your internet connection and computer speed. Once install is done a shortcut will be placed on your desktop. Click the icon and you should be bought to a menu like this. The first thing you will need to do is setup your sound. Click the setup button as shown.
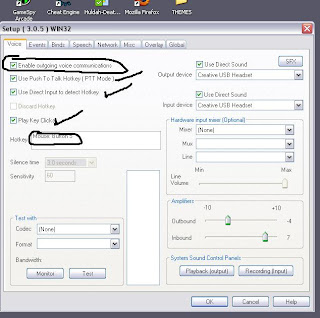


Once your at the setup screen please check the following boxes.
The hotkey button is the button that allow your outgoing communication. Please set it to your liking. I like using my side button so I had it set to Mouse button 5. But that's just me.


Now its time to setup your sound drivers. The first sound driver we will setup are the output drivers. Output drivers will be the driver for your soundcard or headset driver. Always click use direct sound. if you click the drop down menu it will display a list of all the sound drives available.


Now its time to configure the input drivers. The input drivers are the drivers for your microphone. Like we did for the output drivers click  Use Direct Sound and pick your microphone driver from the list of drivers from the drop down menu.


Now configure the sound levels for your card.
Just simply drag the little arrow to your left to right. To increase or decrease sound levels. Output is the sound for your speakers. Input is the sound for mic.
Once your done with that click OK and your down with setup for now.


Now it's time to setup the name you will be connecting to the ventrilo server with. Click the right pointed arrow as shown in the picture.


Now Click the New button as shown.


Then type in the name you wish to use and click OK. Your name is now configured. Now it's time to setup
you the server you wish to connect to.


Now click the right pounted arrow like you did with Username.
Click the new button to setup the name for your server. Type in the name of your server and click OK.


Now type in HOSTNAME or IP in the first Field as check. Then Type in the Port number in the second field as checked. Click OK. You are now done configuring the server.


Now your Username and Server name should be already listed. If it is not click the Drop down arrow in the square and find the USERNAME and SERVER you just configured. Finally, Click connect and congratulations you successfully connected to ventrilo server. Your ventrilo should now look like this if everything worked correctly.


I hope this post was helpful to those struggling with the connection aspect of ventrilo. Enjoy chatting. 

Tuesday, August 17, 2010

How To Tether an Iphone 3G with Full Internet Speed

This tutorial will be a step by step guide on how to tether an Iphone 3G with full Internet Speed. What is tethering one may ask? Tethering is feature allowed by a jail broken iphone to allow your computer whether it be a Laptop or Desktop to share the iphones Internet connection via USB connection or Blue Tooth.

For more information on how to Jailbreak and Iphone please visit youtube and search Jailbreak Iphone xxx(what ever model you may have) There are great video tutorials out there.

Before I start the tutorial I highly advise for you to check what type of data plan you have for your Iphone as this uses up alot of data and extra charges may occur depending on the type of package you have. I have unlimited Data so I don't get any extra charges.

Like I said before. Your iphone needs to be Jailbroken for this to work. Once your Iphone is jailbroken there will be an nifty app called Cydia installed. Click the icon as shown.
 

Once you click the Cydia Icon. Wait a few minutes as Cydia may have to update a few application and load itself. After the loading process you will be bought to menu like this.


Once you click on  manage sources please click Edit and then add.


This is going to add the website where you are going to  download the tethering software from. The website is http://www.sinfuliphonerepo.com


Once you type in the website http://www.sinfuliphonerepo.com in the address bar
click Add Source. Then Done on the top left corner.


Once the website is added click the SinfulIphoneRepo link you will be bought to a list of a free applications. Scroll all the way down till you see PdaNet. Wait a few a moments for the install and press the home button on the iphone.


The PdaNet Icon will now be installed on your computer. Click the icon. Then Click on settings. Click USB mode then click done.


Congratulations, you have successfully installed PdaNet on your iphone. Now to tether the internet from your iphone to computer all you have to do is download the Desktop Client. Visit http://www.junefabrics.com/desktop/ to download the client to what version of OS you have. Once that is completed. Plug in your iphone USB cable and will automatically connect to PDA net if you have it enabled on your desktop. To Verify if it is connected.Press The home button. Then Click the iphone PDA net icon. You should see something like this.


 Thank you and enjoy!

Sunday, August 15, 2010

Keyboard Shortcuts

Do you have a folder that you'd like to be able to open quickly and easily whenever you want? If you create a keyboard shortcut for that folder, you can open it anytime by pressing a key combination, no matter which other programs you have open.
To create a keyboard shortcut to open a folder
1.Click on Start, All Programs, Accessories, and then click Windows Explorer.
2.In Windows Explorer (the program that appears when you open folders such as My Computer, My Documents, My Pictures, or My Music), right-click the folder to which you want instant access, click Send To, and then click Desktop.
Folder selected in My Documents folder, with Send To and then 
Desktop selected on right-click menu
3.On your desktop, right-click the new shortcut, and then click Properties.
Shortcut selected, with Properties selected on right-click menu
4.On the Shortcut tab, click in the Shortcut key box. Now press the letter on your keyboard that you want to use to open the folder.
Note: In the Shortcut key box, Microsoft Windows XP automatically adds CTRL+ALT before the key you press, because to use the shortcut to open a folder, you have to hold down both the CTRL and ALT keys simultaneously, while pressing the letter you chose. This way, your folder won't open every time you type that letter.
The Shortcut to My Pictures Properties page, with the shortcut key
 shown
5.Click OK.
The Shortcut to My Pictures Properties page, with the OK button 
selected
6.Now test your shortcut. Hold down the CTRL and ALT keys, and then press the letter you chose.
Fingers pressing the shortcut keys on the keyboard
This tip can be applied to folders, programs, and text file shortcuts that are placed on the desktop